You are curious about LivePose, the pose detection software developed at Metalab and you are looking for examples of how to use it in order to give you some ideas? Here is one!
In Ballant, we will code together a tiny game based on moving your arms. The name comes for the French idiom “les bras ballants”, which is a way to say that the arms are moving along with the body.
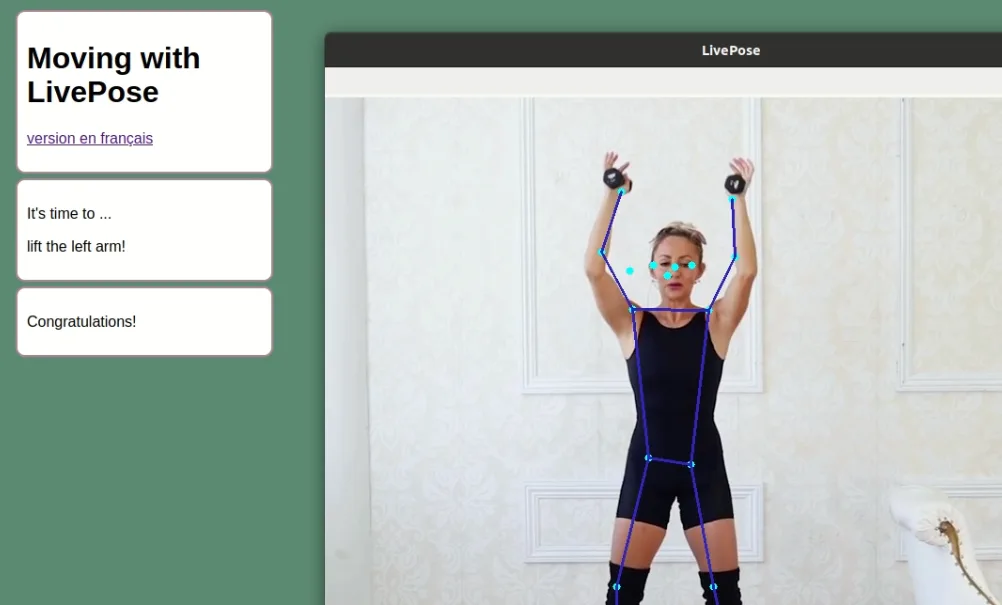
The game program is made of the following elements:
-
an HTML page
-
a CSS file
-
some JavaScript code
-
a LivePose installation
You will need version 0.11.0 or greater of LivePose.
Starting by the end
You can take look at a completed version of Ballant to test this example.
After having installed LivePose, move to the examples/ballant folder:
cd examples/ballantInstall the example with:
npm installStart the game:
./ballant.shA few terminal windows will open and a web page will appear, as well as the LivePose window. Select the web page window: instructions will be displayed, telling you the expected movements.
You are now ready to play: move your arms up or down. Your success will be displayed on the screen!
How Ballant works?
The JavaScript program is responsible for sending and processing the OSC messages sent by LivePose. This code checks that the position of the arms as detected by LivePose match the position asked by Ballant. Finally, this code is in charge of communicating with the Ballant player through the web page.
If you want more information, keep reading: we will go through every necessary step to the making of Ballant as a way to inspire you for your own projects.
Overview
Here is a diagram to give an overview of the project. A description of the diagram follows.
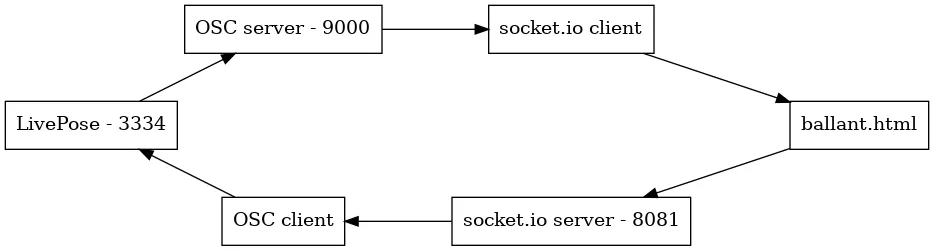
On the diagram, we have the following nodes and connections:
-
LivePose is given the port 3334
-
the LivePose node can communicate with the OSC server on port 9000
-
the OSC server communicate with the socket.io client
-
the socket.io client send the information to the ballant.html webpage
-
the ballant.html webpage communicate with the socket.io server on port 8081
-
the socket.io server communicate with the OSC client
-
finally, the OSC client connects with LivePose on port 3334.
This diagram is inspired by the one found on the JavaScript ‘osc-web’ library that is used in this project.
First, the web page
The web page is titled ballant.html. Let’s take a look at its content and emphasize the essential parts.
Some metadata with <head>
In the metadata header, we can find two <script> tags and a <link> one:
<script src="ballant.js" defer></script>
<script src="http://127.0.0.1:8081/socket.io/socket.io.js"></script>
<link href="style.css" rel="stylesheet">
The first tag enable us to create a link to the JavaScript code of Ballant, the ballant.js folder.
The next tag creates a WebSocket connexion for OSC messages, with address 127.0.0.1:8081. The first part, 127.0.0.1, is also called localhost and it is the local address of your computer´; the second part, 8081, is the port used for communicating.
The last tag tells the webpage where to find the CSS file style.css.
Together, these lines defines how the webpage will talk to other components, the code that will be run by the webpage, and how the webpage will look.
Human-machine communication
In the <body> section of the webpage, we have a variety of <div> tags. These tags are useful for structuring the content. We have two <p> tags, for paragraph, with associated id s:
<div class="info">
    <p>It's time to ...</p>
    <p id="action">... get ready!</p>
</div>
<div class="info">
    <p id="congrats">Try again.</p>
</div>
The <p> tag with action for id is used for telling the human player how to move their arms.
The <p> tag with congrats for id allows us to let the human know the state (success or failure) of the game.
An interactive webpage with LivePose
We will use JavaScript to code the logic of the Ballant game.
First, let’s configure LivePose.
LivePose configuration
The default.json file contains the LivePose configuration for the Ballant game.
To create a connexion with the ballant.js script, we need to define a connection port:
"outputs": {
    "osc": {
        "destinations": {
            "localhost": 9000
        }
    }
Note the number used, 9000. We will see it again at the next step.
Connecting the webpage and LivePose
Let’s build a bridge between LivePose and the webpage in the ballant.js script.
Start by creating a connection between the wegpage and the script:
var socket = io('http://127.0.0.1:8081');Here, we use the same port as the one in the webpage metadata header.
Create a connection between the script and LivePose:
socket.on('connect', function() {
    socket.emit('config',
        {
                server: {
                port: 9000,
                host: 'localhost'
            },
                client: {
                port: 3334,
                host: '127.0.0.1'
            }
        });
});
The 9000 port is the same as the one in the LivePose configuration.
The 3334 port allows LivePose to listen to messages sent by the webpage.
Processing messages
The connection between components being done, we can start processing messages received by the ballant.js script from LivePose.
We receive these messages in the socket.on function:
socket.on('message', function(obj) {
    // code ...
}
All the code inside this function relates to the processing.
The first if instruction allows us to keep in memory the received informations. Here, we are interested in the ‘armup’ filter.
if (obj[0].includes("armup")) {

    var current_arm = obj[0];
    var current_status = obj[1];

    if (current_status == 1){

        if (current_arm.includes('left')){

            armleft_up = 1;

        } else if (current_arm.includes('right')){

            armright_up = 1;

        }
    }
We are ready to evaluate the success/failure status of the received messages. Note that the variable ‘required_pose’ containts the pose required by the Ballant game.
if (required_pose == possible_poses[0]){

    if ( armleft_up == 1 && armright_up == 0 ){

        sayCongrats();
    }

} else if (required_pose == possible_poses[1]){

    if ( armright_up == 1 && armleft_up == 0){

        sayCongrats();
    }

} else if (required_pose == possible_poses[2]){

    if ( armright_up == 1 || armleft_up == 1){

        sayTryAgain();

    } else {

    sayCongrats();
    }
}
The content of both sayCongrats() and sayTryAgain() functions will be discussed in the next section.
Game loop
The game loop can be found inside the changePose function. This loop creates a new pose, displays it on the webpage and also let the player know the success/failure status of the current pose. This function is called every 3 seconds by setInterval.
- Generating a new pose
We randomly pick a new pose from the possible_poses list of possible poses, as coded in the getPose function:
function getPose(pose){
    return possible_poses[getRandomInt(possible_poses.length)];
};
Note that the getRandomInt(m) gives a random integer with a value less than m. Here, m takes the value the number of pose options, in other words, the length of the possible_poses list.
- Displaying the pose
Let’s take a look at the changePose() function to understand how the pose is displayed:
function changePose(){

    document.getElementById("congrats").innerHTML = "Try again.";

    required_pose = getPose(possible_poses);

    armleft_up = 0;
    armright_up = 0;

    document.getElementById("action").innerHTML = required_pose;
}
The Ballant player can know access the new pose required by the game.
- Displaying the result
We want to let the player know the success/failure status of the game. This is done by two quite similar functions called sayCongrats() and sayTryAgain().
function sayCongrats(){
    document.getElementById("congrats").innerHTML = "Congratulations!";
}
When the player is successful, the “Congratulations!” message is displayed on the webpage, where the paragraph with the congrats id is.
Similarly, when the played has failed, we call the sayTryAgain() function:
function sayTryAgain(){
    document.getElementById("congrats").innerHTML =
        "You have lift at least one arm. Please try again.";
}
The message displayed by this function spur the player to try again. This message is displayed in the paragraph with the congrats id.
A script to run everything
To play Balant, we need to activate the various components.
The instructions to do so can be found in the ballant.sh script:
gnome-terminal -- npm run start
gnome-terminal -- sensible-browser index.html
cd ../../
gnome-terminal -- ./livepose.sh -c examples/ballant/default.json
cd examples/ballant/
It is also possible to run these three steps independently with the command line.
Done and ready!
We saw the detailed steps to creating Ballant in this tour.
If you need some help or more information, get in touch by:
-
opening a comment in a Gitlab issue on the LivePose repo
-
attending one of the Metalab’s office hours
For more information
For all the details, read the MR 173 on GitLab.
Credits
Image taken from Action Jacquelyn - Gentle Barre Workout - YouTube.