2023-06-07
Week 1
Click here to access Blog 1.
2023-06-15
Week 2
One of the objectives assigned to me this week was to reinstall SATIE by utilizing a locally cloned repository via git on the localhost [Quarks.install("/path/to/checked/out/SATIE");], as opposed to directly downloading it from the remote source in the SuperCollider compiler [ Quarks.install("SATIE")]. This approach offers the benefit of making the downloaded SATIE better for development purposes.
Subsequently, I utilized the freshly downloaded SATIE to generate a SATIE configuration and encountered the error depicted in the image provided:
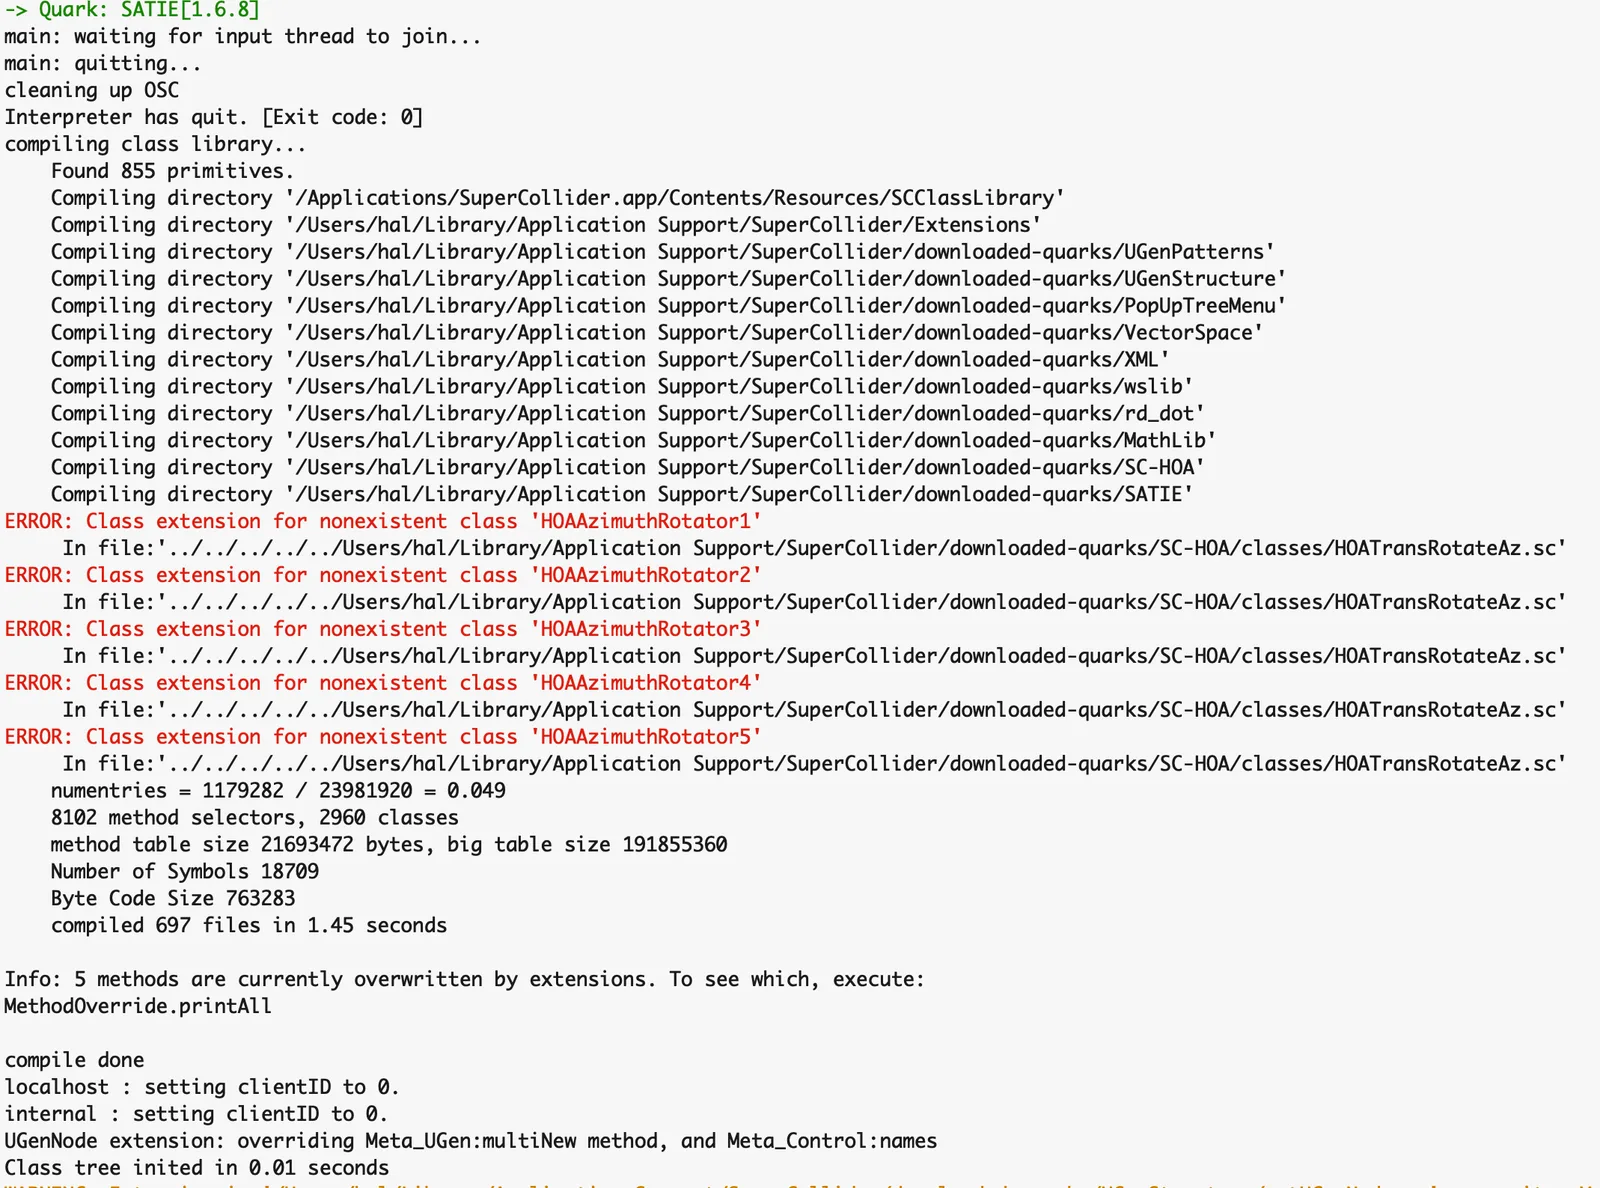
The issue was successfully fixed by re-downloading sc3-plugins.
Pending issues:
1. The attempt to run the examples provided in the Ambisonics chapter of the SATIE documentation using the re-downloaded SATIE was unsuccessful.
2. The perception of spatialization through SATIE is not distinct for me. When running
(
Routine {
~addr.sendMsg('/satie/source/set', 'mySource', 'aziDeg', 30);
3.wait;
~addr.sendMsg('/satie/source/set', 'mySource', 'aziDeg', 60);
3.wait;
~addr.sendMsg('/satie/source/set', 'mySource', 'aziDeg', 90);
}.play;
)
I am unable to perceive the movement of the sound source clearly. Nevertheless, the perception of spatialization effects can be subjective in nature.
2023-06-21
Week 3
The Challenges and Work Done This Week
-
During the server boot process in SuperCollider, it is essential to ensure that the sample rates of both the input and output devices are consistent. Typically, the built-in input and output devices on a computer are standardized to a sampling rate of 44100Hz. Consequently, if the internal microphone and speaker of the computer are utilized directly, the occurrence of sampling rate mismatch errors is generally unlikely.
For an enhanced spatial audio experience, it is highly recommended to utilize headphones, as they provide a heightened sense of space and immersion. Additionally, the level of immersion can be directly influenced by the number of loudspeakers employed. The greater the number of speakers, the more functional and rich the SATIE system becomes, as it is able to deliver a more immersive auditory experience. Imagine an auditory landscape where sounds approach you from various directions.
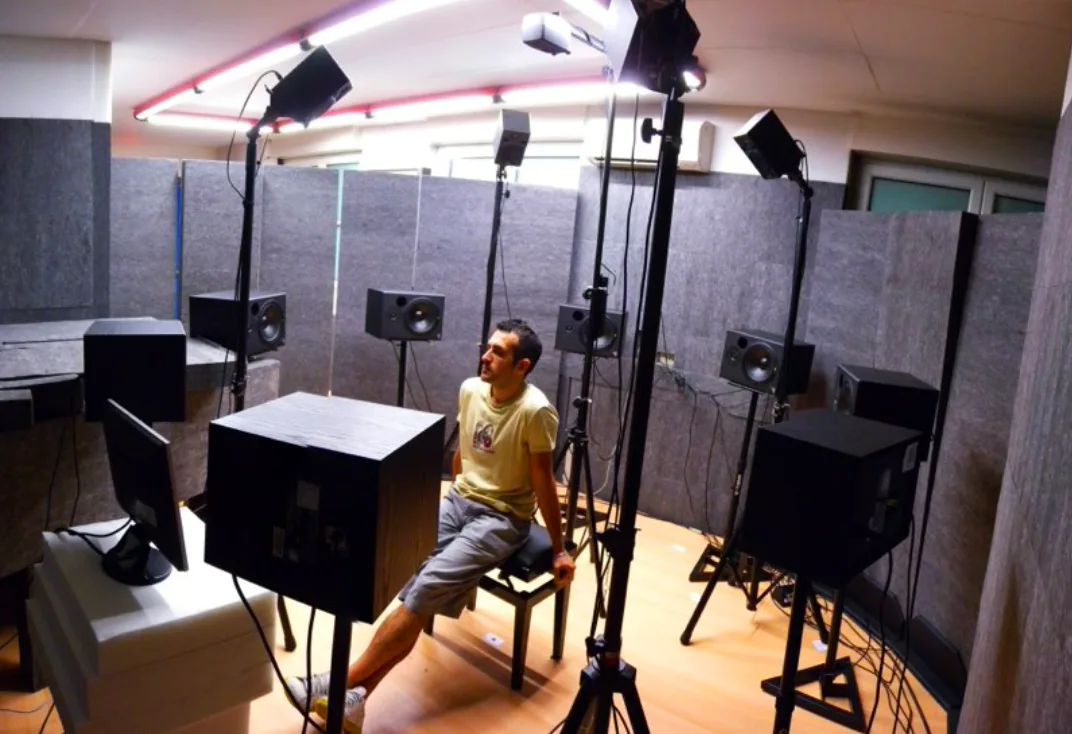
Figure: Ambisonics system in Sound and Music Computing Lab, Como Campus of Politecnico di Milano The headphones equipment I utilized was the Airpods Pro, which is not recommended for work on SuperCollider due to their embedded microphone only providing mono input with a default sample rate of 16000Hz, which cannot be modified. The Airpods Pro has an output sampling rate that can be set to either 16000Hz or 48000Hz, and they support two-channel output. This frequently leads to mismatch issues in the sampling rates and channels between the input and output, resulting in errors.
To address this issue, I employ the Aggregation Device Tool within the Audio MIDI settings on my PC. By establishing a new Aggregation Device, it becomes possible to flexibly combine arbitrary existing input and output devices, enabling the selection of suitable devices with matching sampling rates and channels. This approach effectively resolves the issue of sample rate mismatch.
NOTE: On OSX, before server booting, you need to enter and run the code
Server.default.options.device = "The_Name_of_Your_Aggregation_Device";for selecting the Aggregation Device.
-
The SATIE environment was successfully configured last week. This week, our focus is on running the basic SATIE model. To begin, we need to establish a SATIE configuration utilizing the Spatializer. This involves instantiating a SatieConfiguration:
~satieConfiguration = SatieConfiguration.new(s, listeningFormat:[\octoVBAP]);The choice of the
listeningFormatparameter aligns with the specific Spatializer being used. Each Spatializer represents a distinct audio spatialization structural layout, determining the configuration of simulation outputs, such as the quantity and positioning of sound sources. Subsequently, utilize the configuration to generate a Satie object, that is instantiating the SATIE renderer and boot it:~satie = Satie.new(~satieConfiguration); ~satie.boot();Lastly, generate an audio source, and different azimuth degrees are set to manipulate the sound array, aiming to achieve the desired audio spatialization effect:
~synth = ~satie.makeSourceInstance(\dusty, \dustyRez, \default, synthArgs: [\density, 7, \attack, 15, \gainDB: -10]);


~synth.set(\aziDeg, 0)
~synth.set(\aziDeg, -90)
GUI for SATIE scenarios
The SatieGUI tool offers a nice means of comprehending the audio spatialization capabilities supported by SATIE. (Thanks to Edu @edumeneses for providing) I will demonstrate its usage. Here is the code:
~visualizer = SatieGUI.new(~satie);

~visualizer.drawViews;
After successfully booting the SATIE server, you can open the GUI using the above code. The GUI is illustrated in the figure below:
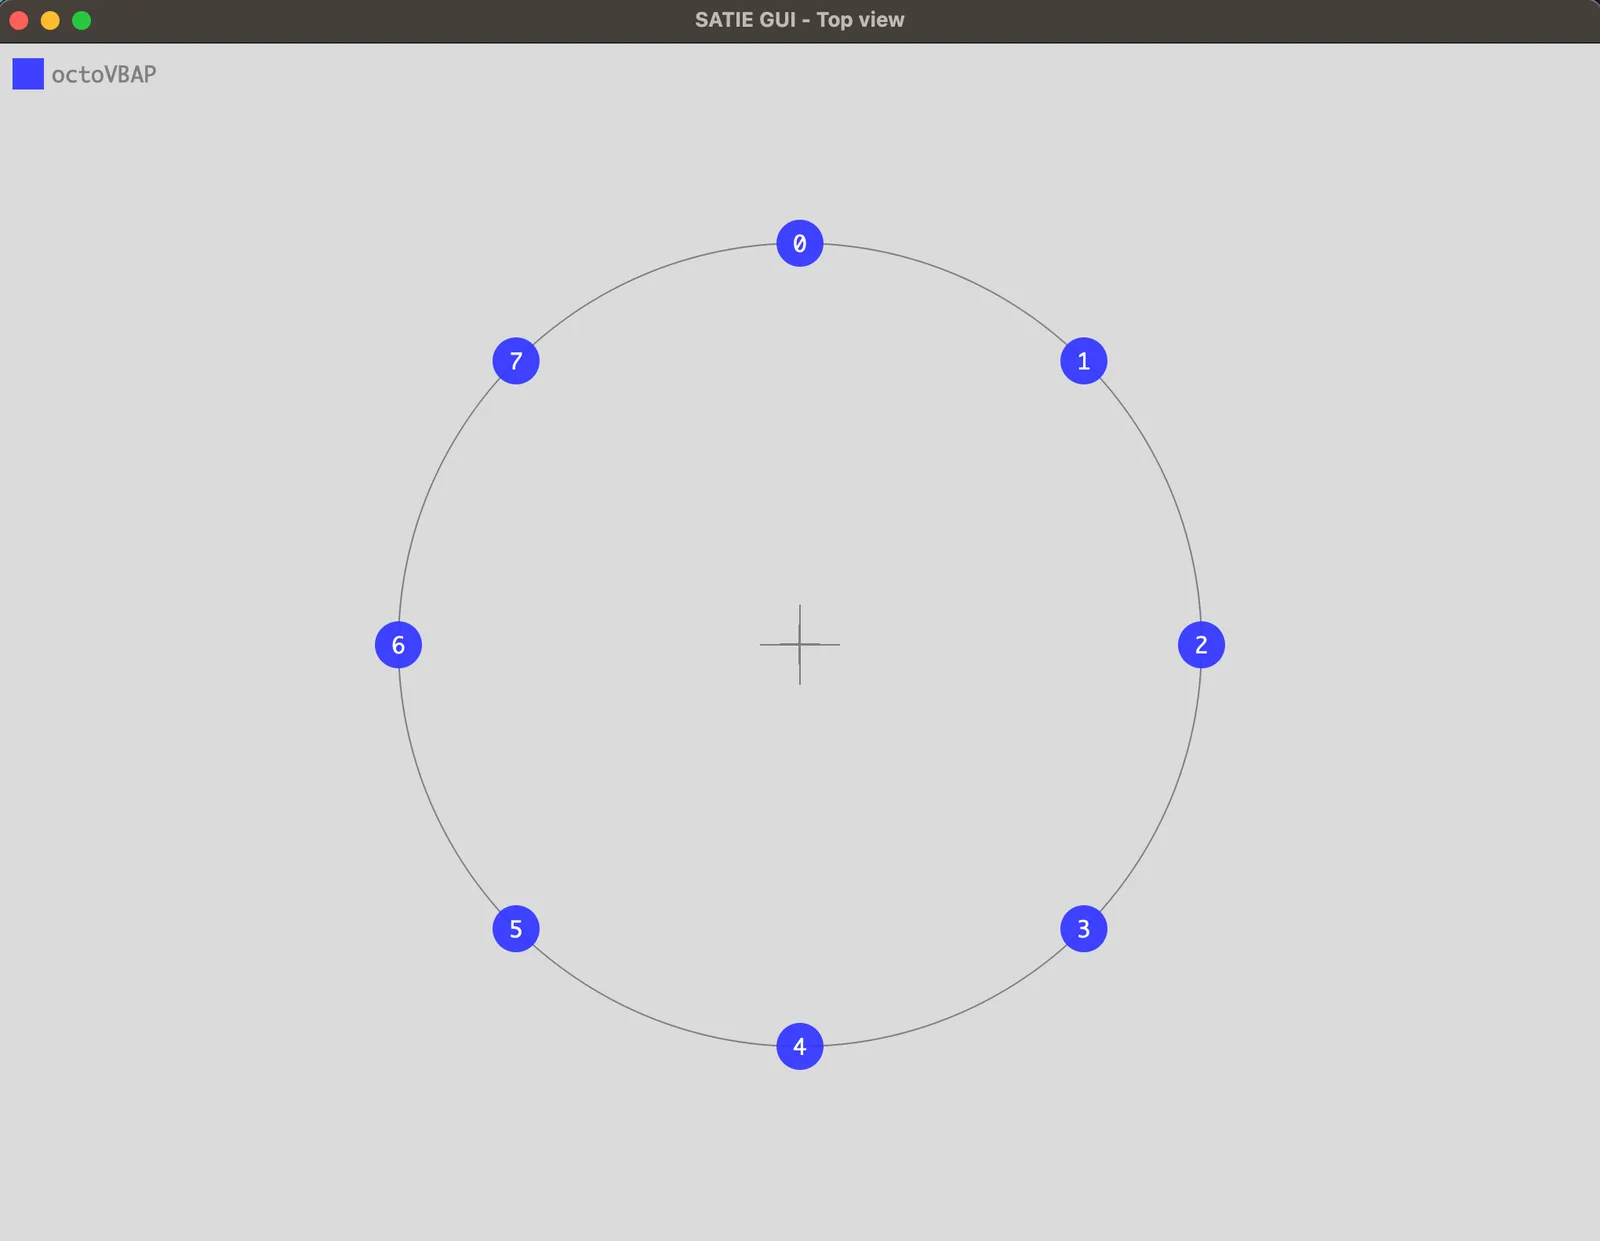
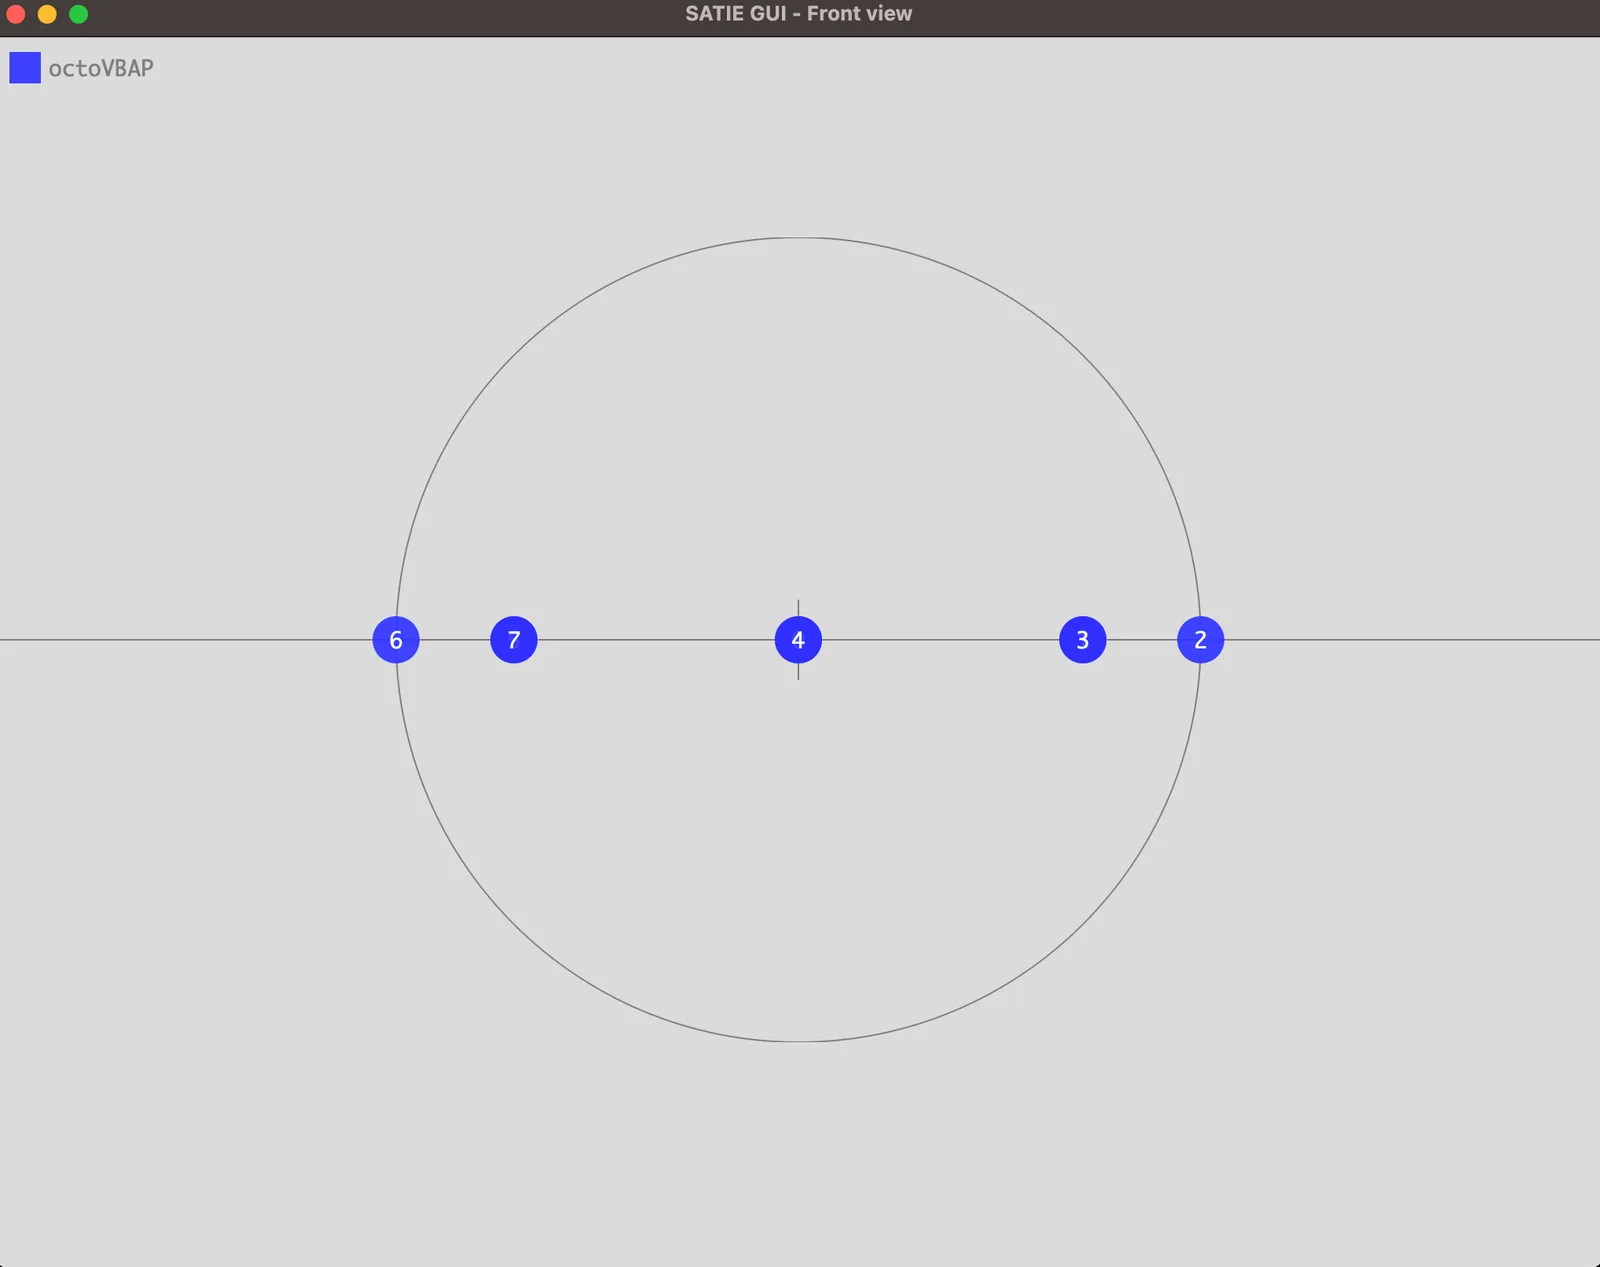
By selecting different Spatializers, you can observe varying arrangements and quantities of point sources on the GUI. In this example, octoVBAP is utilized. It is worth mentioning that you can also employ multiple Spatializers simultaneously, but it is necessary to declare the output channels for each one beforehand by using outBusIndex when setting the SATIE configuration. Based on the figure, the point source with a serial number represents the sound source within the audio spatializing generated by the Spatializer. By setting different azimuth directions, you can activate the corresponding sound source positioned in that direction. For instance, the point source labeled as 0 is positioned in front of the user, while point source 2 is on the left side (set variable aziDeg to 90 ), point source 6 is to the right side (set variable aziDeg to -90), and point source 4 is positioned behind the user (set variable aziDeg to 180 / -180). To ensure an accurate perception of audio spatialization, especially in cases where the user’s output device has limitations, the Server Meter Tool in SuperCollider can be used as a helpful aid to monitor the data with precision:
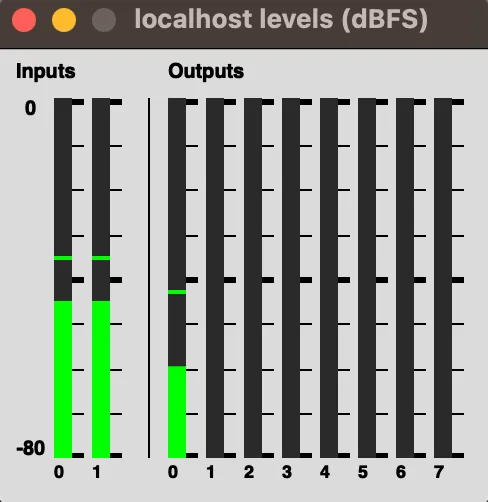
As shown in the figure, the 7 output channels correspond to the numbered point sources in the GUI introduced before one by one. When the azimuth angle is adjusted to 0 degrees(~synth.set(\aziDeg, 0)), it is evident from the Meter that only channel 0 displays signal fluctuation. This confirms that only the sound source directly in front of the user is activated.
Mapper
Mapper, a plug-in in SATIE, is the focus of my research and development in this project. Firstly, really appreciate Michal @djiamnot for creating the diagram and using Blender for modeling, as well as Edu @edumeneses for providing detailed explanations. Their contributions have greatly enhanced my understanding of Mapper.
2023-07-02
Week 4
Mapper
Mapper, a plug-in in SATIE, is the focus of my research and development in this project. Firstly, really appreciate Michal @djiamnot for creating the diagram and using Blender for modelling, as well as Edu @edumeneses for providing detailed explanations. Their contributions have greatly enhanced my understanding of mapper.
📝 The primary function of mapper is to improve the flexibility to select and switch spatializers used in real-time. By introducing additional parameters, the sound scene configuration was further fine-tuned and get refinement, and the spatial arrangement was further enhanced, with a particular account of the semantic relationships between different spatializers. This enables better and more convenient adaptation of various spatializers to different scenarios when using SATIE.
Spatializer
Each spatializer represents a distinct audio spatialization structural layout, determining the configuration of simulation outputs, such as the quantity and positioning of sound sources. Under the directory ./satie/plugins/spatializers in the SATIE repository, the current various types of saptilizers can be viewed.
The spatializers I have utilized are \stereoPanner, \headphoneListener, and \octoVBAP so far. The first two spatializers provide sound sources on the left (-90) and right (90) sides, respectively. And for the \octoVBAP (\domeVBAP, \exaVBAP, etc. also the same) spatializer is the practical application based on the principle of VAPA (Vector Base Amplitude Panning) on the Supercollider, which allows for the creation of multiple surround-type virtual audio sources in order to enhance the richness and effectiveness of audio spatialization.
Mapper \nearFarField1
This mapper simulates a virtual near and far field by scaling the gain of different spatializers to create distinct perceptions of the distance between the user and the associated sound sources from each spatializer.
By analyzing the source code of the mapper(nearFarField1.scd), it can be seen that the key parameter in this mapper is nfIndex, which is the index of the near field and used here as the gain scaling factor.
nfGain = gainDB.dbamp * nfIndex;
ffGain = gainDB.dbamp * (1 - nfIndex);
From the above code, nfIndex + ffIndex = 1. Assuming nfIndex = 0.3, the gain ratio between the near field and the far field is 3 : 7(not dB scaling). When the nearFarField1 mapper is used in two stereoPanner spatializers, the resulting effect is as follows:
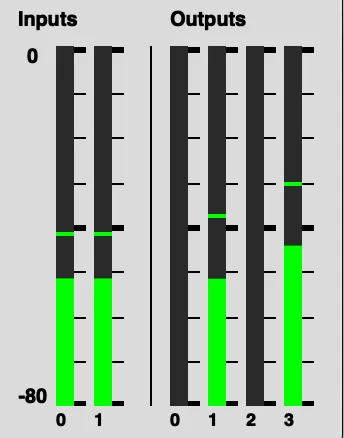
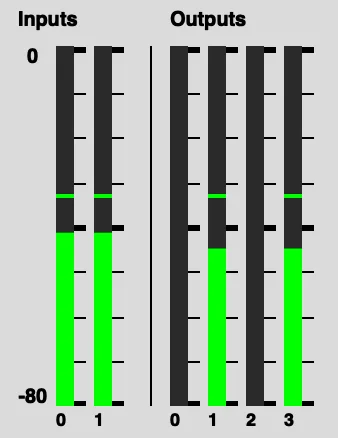
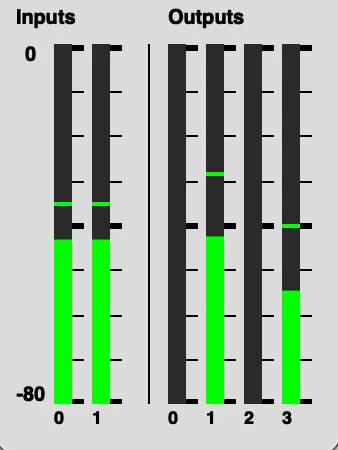
In the demo above, outputs channels 0 and 1 correspond to the output of one stereoPanner, while channels 2 and 3 correspond to another stereoPanner. By adjusting the parameter nfIndex, distinct near and far field effects can be observed.
NOTE: In this demo, the parameters are identical except for the nfIndex parameter, while aziDeg is set to 90 all(right hand).
Test various sounds using Mapper \nearFarField1
| Sound Name | \aziDeg | \nfIndex |
|---|---|---|
| dustyRez | ✅ | ✅ |
| Tubie | ✅ | ✅ |
| Gravity | ❌ | ✅ |
| Marimba | ✅ | ✅ |
| SpaceDolph | ✅ | ✅ |
| … | … | … |
2023-07-16
Week 5 & 6
cartesianControl Mapper
The objective of this mapper is to independently adjust the position of the spatializer in the Cartesian coordinate system by specifying the individual coordinate points x, y, and z.
Now there are two ideas to create this mapper:
- Previously, the position of the spatializer was controlled using the azimuth degree parameter. Therefore, my initial idea was to establish a link between spherical coordinates and Cartesian coordinates. This involved controlling the parameters aziDeg and eleDeg by introducing new parameters, namely coordinateX, coordinateY, and coordinateZ, to manipulate the position of the spatializer.
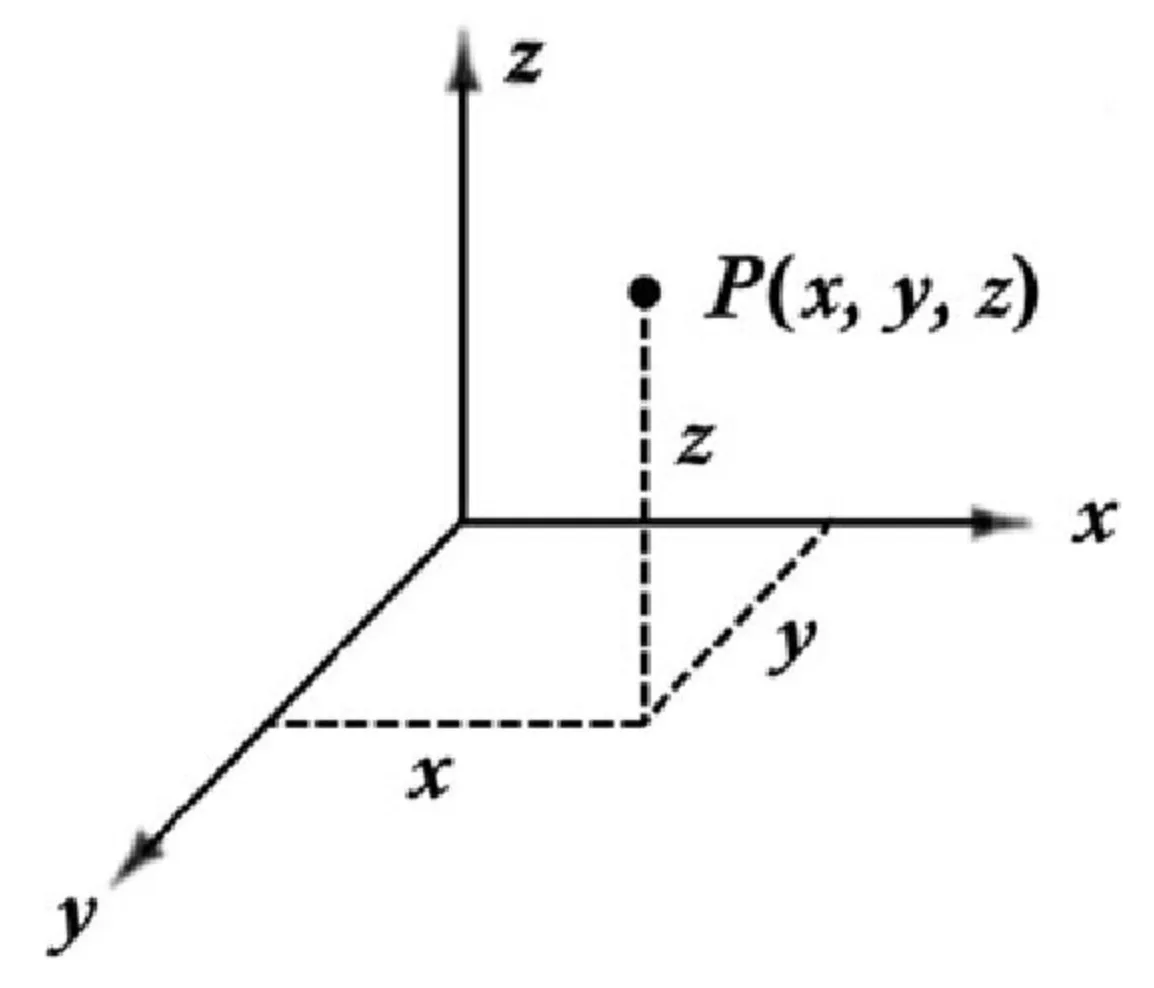
In ambisonics, the right-hand principle can be applied when using the Cartesian coordinate system. The x-axis represents the front-back orientation, while the y-axis corresponds to the left-right orientation (with positive values indicating the left side).
These two coordinates can be converted between each other. In SuperCollider, the corresponding coordinate system can be established using the class methods Spherical and Cartesian. By utilizing their mathematical functions, the conversion between the two coordinate systems can be achieved.
For example:
~rho = 1; // meters
~azi = 90; // degrees
~ele = 0; // degrees

~spherical = Spherical.new((~diameter),((~azi*pi)/180),((~ele*pi)/180)); // Create a new spherical coordinate with the above parameters

~spherical.x; // Answer the cartesian coordinate x of the receiver
~spherical.y; // Answer the cartesian coordinate y of the receiver
~spherical.z; // Answer the cartesian coordinate z of the receiver
The above conversion gets a point (0, 1, 0) in the cartesian coordinate system. This means that the value on the y-axis is positive, indicating that the spatializer is positioned on the left.
- Simulate various points in the Cartesian coordinate system by adjusting the magnitude of the gain.
2023-07-28
Week 7
The flow chart shows the construction of SATIE
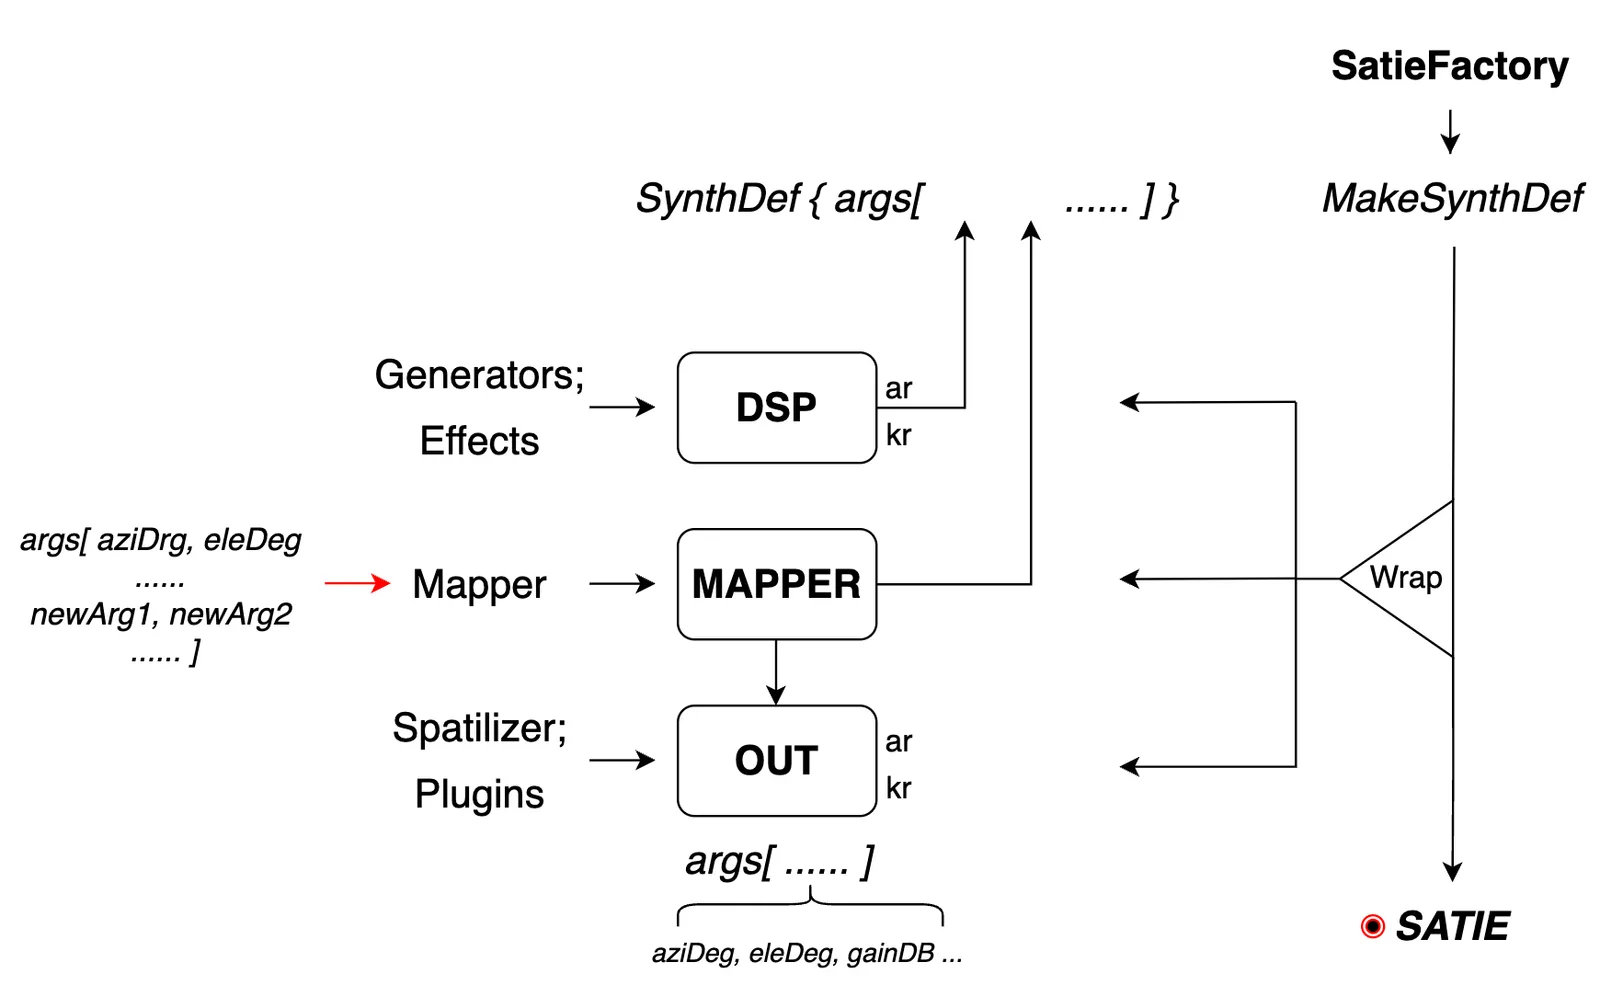
Flow chart of SATIE
From the depicted flowchart, it is evident that the mapper is utilized prior to the spatializer, introducing new adjustable arguments. Depending on the specific objectives, distinct mapper controls default output parameters based on corresponding algorithms and formulas through the newly introduced arguments. This enhances the flexibility and expandability of the entire process and further enriches the functionality of SATIE.
cartesianControl Mapper
With the utilization of this mapper, you have the capability to set the position of spatializer by defining 3D points (x, y, z) within the Cartesian coordinate system.
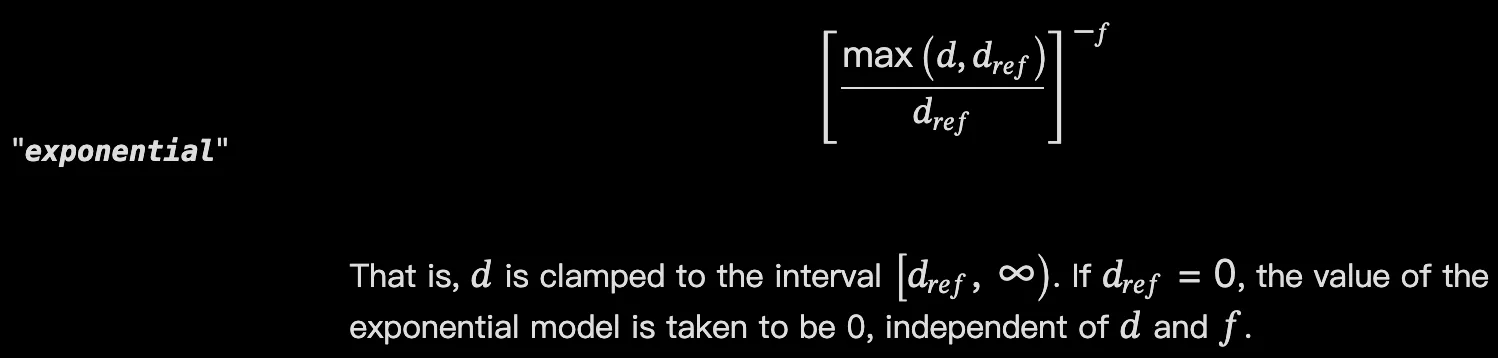
For the attenuation of gainDB according to the distance, we utilize two models, the inverse distance model and the exponential distance model, to simulate and determine the reduction of volume as an spatializer moves away from the listener.
Pending issues
When setting the position of spatializer using one mapper, the 3D points in the cartesian coordinate system and azimuth and elevation in the spherical coordinate system can be set and successfully implement at the same time.
Some new ideas for Mapper
-
Real-time Spatializer Control: The position of the spatializer is controlled in real time by the position of the mouse, which enhances the interactivity and enjoyment of SATIE.
-
TouchOSC Integration: Connecting Supercollider with TouchOSC via OSC, users can control mapper parameters through their phone. For instance, the movement data accelerometer and gyroscope of the phone can be associated with the mapper for a more versatile experience.